Showing posts with label DYI. Show all posts

Tuesday, July 24, 2012

Tricked Out Tricycle

Well, I may be slow, but I eventually follow through. As promised, here is the saga of the "Tricked Out Tricycle..."

I found this lovely little Craigslist special a few weeks ago. For $25, I thought it was a good deal. It was the perfect size trike for my little girl and even came with a sun canopy! There was a lot of sun fading and some pretty ugly peeling Disney princess stickers, but I figured that I could update it with a paint job to make it like new...


Little did I realize all the steps that go into properly painting a bike! Taking it apart, taping the non-paintable parts, sanding, priming, painting...ugh. There had to be an easier way.

That's when I started surfing the interwebs for some ideas, and then it came to me! DUCT TAPE.

I bought some butterfly duct tape on Ebay, took the trike apart, thoroughly washed everything, and wrapped the frame in the butterfly tape. This is the result:


Nifty, hey? I mean... LOOK AT IT. Except for the tires it looks new!


The canopy had some very faded "Disney Princess" decals. Butterfly duct tape is definitely better! (I can't stand Disney princesses...)


The old white handlebar grips were severely chewed-upon and gross. Oddly enough, the purple foot rests were in respectable condition. I pried both the gross handlebar grips and the foot rests off the bike. I threw away the handlebar grips and replaced them with the newly cleaned foot rests instead. I purchased some new handlebar ribbons and a new bicycle basket on ebay (I love ebay). Some super glue now holds the handlebar ribbons in place. I covered the foot rests with generous layers of butterfly duct tape.


A cute butterfly bell and some reflective stickers on the wheels top it all off. So there you have it - an original, one-of-a-kind tricycle that's new to us for under $40 total!

Tuesday, July 3, 2012

Babushka Toms!

So I got a new pair of Toms. But they were gray. Much too boring for me.

Ever inspired by Pinterest, I wanted to decorate them. I wanted something that would reflect my faith without being to cheesy or in-your-face.

I love this verse from 1 Corinthians 13:13
"And now these three remain: faith, hope and love. But the greatest of these is love."

And I also love Babushka dolls.


So I carved some stamps...


And used these fabric markers to stamp my Toms...


But the original stamping wasn't that dark, so I used a fine paintbrush to fill in the outlines. Here are the results.


I gently ironed them to set the ink in place. Now I have the coolest Toms in the world.


Get it? The greatest of these is LOVE. :)

Tuesday, May 8, 2012

Blogger Makeover How-To

Sorry I didn't post yesterday. The kid was a little crazy, so I didn't have time to update any of my shops.

But as promised, here's a description of how I made my blog look like the wonderful piece of bloggery it is today.

First, you need to start with a background picture that:
1. Isn't too crazy, but yet interesting.
2. Says something about you as an artist and/or blogger.

I chose this turquoise wood siding because I love the color and I love the vintagey texture.

I obtained the original picture from rgbstock, a nifty little website where you can download free ad-free stock photos. They require you to sign up, so make sure you use your spam email address when signing up, just in case.

Now, if you find a background photo that you like, but it needs a little TLC before it's suitable for blogging, check out PicMonkey. PicMonkey is a free photo-editing software that you can use to easily refine your photo. It also has some really swell vintage filters that can give your background an old-school feel. Fiddle around with the filters and save the final copy that you like. Just a warning - it's easy to get carried away! Don't mess with it too much - you don't want your background to take attention away from your writing on your blog.

Now here comes the part specific to people using Blogger. Yes, I still use Blogger. I've been using Blogger ever since blogging was cool, (think pre-facebook) and I'm not about to learn how to use Wordpress or tumblr or any other of the cool blogging sites. I'm loyal, by golly! *shakes fist*

Actually, I simply don't have the time or patience to learn something new at this point, especially with a toddler constantly banging on my keyboard.

So how to make your blog look all fancy-dancy like mine in Blogger:

1. Go to your blog's setup page. You will want to begin by downloading a copy of your current template just in case you mess something up royally. To do this, click on "Template" on the left hand menu and then click on "Backup/Restore" on the upper right hand corner. Click on the picture below to see a full-scale version of what I'm talking about.


2. To make your blog navigate like mine does (with the navigation bar at the top) click on the first "Dynamic view," Which is also known as the "Classic" dynamic view. (Again, see picture above to get an idea of what I'm talking about.) Apply this template to your blog.

3. Now you will want to customize this template so that your background and fonts are the way you want them to be. Click on the orange "Customize" button to do this.

From here, we will refer to this nifty little menu (click to enlarge):

The two sub-menus that you want to adjust are the "Background" menu and the "Advanced" menu. Don't worry - it's not that hard!

4. In the "Background" menu, click on the little arrow next to the background image (I've circled it in the picture below for you - click to enlarge.)


From there, you will either want to choose a pre-fab Blogger background (yawn) or upload the one that you made for yourself (yay!).


Click on "Upload Image" and choose the image from your computer that you want as your background. A couple of Blogger snafus with this: Blogger is VERY fussy about file size. Make sure your image is no larger than 300k and 1800 x 1600. You will want to use a photo-editing software to make your picture the correct size. I used Adobe Elements to do this, but there are other online versions that do this as well. If you use Adobe, make sure you save your jpg as a quality 5 or 6 file so that you don't wig out Blogger's uploader.

I have also found that uploading files to Blogger late at night is much faster than trying to do so during the day here in the States. Less traffic, maybe? Dunno. But midnight blogging seems to be the way to go.

5. Once you have your background neatly in place, you will want to adjust the fonts and color schemes of the blog to match. To do this, click on the "Advanced" button on the gray menu, mentioned above.


Now comes the fun part. Use the sub-menu to play around with the colors, fonts, etc. until you find a combo that you like. Don't worry about permanently messing it up - you can always revert to the original template by clicking on "Clear advanced changes to page" (see picture above - click to enlarge).

When you are finished with playing around with the fonts and colors, click the orange "Apply to Blog" and then "Back to Blogger" on the upper right hand corner of your workspace.

6. Now you will be back at your Blog's control panel. We will next make "pages" for your blog. "Pages" are nifty features that allow your blog to link to other websites using your blog's navigation menu. But the cool secret is that you can use "Pages" to link to specific posts within the blog itself, allowing you to classify your posts according to topic. For someone like me, with a wide range of topics, this makes it easy for your readers to find only the posts that most interest them.

To do this, we will be using the "Pages" feature and the labels that you use in the individual blog posts themselves.

Before we move on, let's pretend that you blog about three topics: shoes, goats, and video games (bear with me, it's late). For each blog entry that you create, you will want to label it with a one-word label according to the topic discussed. For example, every shoe entry will be labeled with shoes, every goat entry will be labeled with goats, and every video game entry will be labeled with games (remember, one word).

For this to work correctly, the labels in your blog posts must be spelled correctly and used consistently. For example, if you replace "shoes" with "shoe," it will not show up in the link to your "shoes" posts. Be forewarned.

Okay, back to the "Pages" feature. You will want to create a new page that links to a web address. When asked for the web address, enter:

http://your blog's url/search/label/the post label you want it to link to

But make sure you change the bits in bold to reflect your blog's url and your label.

Repeat these steps for every one-word label you use on your blog posts.

Remember, for this to work, your blog post labels have to match the web address exactly. If you post something with the label of "video games," it won't show up on the page with the web address of "games."

And that's it. Have fun making your blog more...you!


Wednesday, February 29, 2012

It only took me three months to knit...

... but I think it was worth the wait.
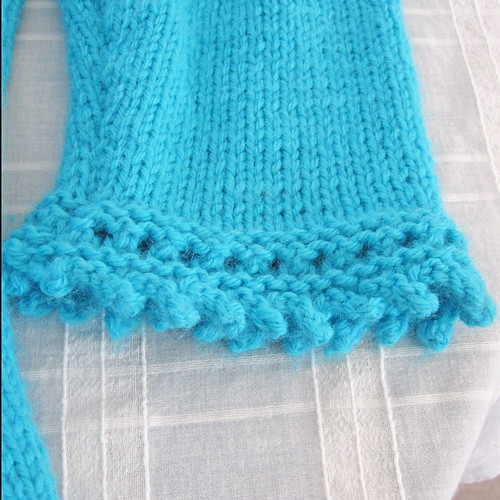
Stockinette stitch lower and sleeves, ray of honey stitch top, yarn overs and picot cast on/off on trim. Garter stitch with yarn overs for button band. Hand knit by me with Pound of Love yarn.
The back. Stockinette stitch lower and sleeves, ray of honey stitch top, yarn overs and picot cast on/off on trim.
Picot sleeve detail.

Wednesday, February 10, 2010

The Fabric You've Been Dreaming Of

Do you ever had an idea in your head for a bag (or a skirt or other fabric-made thingy), but you can't find a fabric that resembles what you envision, and then your dream bag (or skirt or other fabric-made thingy) is dashed to bits because no other fabric will do? Yeah, me too.

Until today.  A friend of mine introduced me to spoonflower.com, a wonderful fairyland of fabric where you can (get this, folks) DESIGN and PRINT your own custom fabric!  You read it right.  How cool is THAT?

Well, yes, it's pricey.  But when nothing else will do, we now have somewhere to design exactly what we want!

Yippee!

Monday, October 26, 2009

DIY Business Cards

I design my own business cards.  Always have.  The reason why is because as an artist, I think it's cheap to have someone else's artwork on the card that is representing you and your art.  Therefore, I have always designed and ordered my own business cards online.

But there are some problems with this.

#1 - It's expensive.  I print both the front and the back of my cards because I have two shops - Echoes of Stars' Designs and Simple Stuff Skin Care.  Although this saves paper, it jacks up the printing cost of the cards.  Not to mention that I always do a custom design of my own artwork as the background, which also increases the cost.  I tried printing them at home on my printer, but that also is not cost effective since printer ink is so expensive!

#2 - I always felt bad about my cards' impact on the environment.  Ordering business cards online does not leave you many options for recycled material.  Printing your own is better because you can purposefully choose recycled paper, but there's still the environmental impact of the ink and printer cartridges to consider.

What to do, what to do?  Well, I stumbled upon www.iprint.com where you can custom design a business card-sized STAMP.  Yes, folks, a STAMP!  Then you can stamp your own cards and only have to pay for stamp pad ink (which is way cheaper than printer ink)!

Now here's the really cool part - I use scraps of cardboard I find lying around the house for my cards.  Not only is it recycled, it's also being reused!  And the next time I go to the scrapbooking store, I'm going to buy some environmentally-friendly ink.  How cool is that?

Just thought I'd share. :)

Wednesday, October 14, 2009

Car Seat Canopy

So after searching and searching for something to protect Little One from the cold, wind, snow, and rain while traveling to and from the car, I finally gave up.  I had found some car seat canopies online, but none in a fabric that I liked.  (Heck, if I'm goning to be hauling around a car seat, I want it to look good while I'm carrying it!)

So I decided to make my own.  I found a tutorial on this wonderful blog: While They Sleep by Hannah Stevenson.  The only problem is that I haven't worked a sewing machine since I was in middle school home economics class.  But such little things don't stop me!

So this is what I came up with.  I have to say I'm pretty proud of myself.  Not only did I not have a pattern, I figured out my sewing machine in one evening, and when I took Little One for her first vaccination, the nurse was impressed with my canopy!  She had never seen a car seat canopy before.  But before I made this, neither had I.


Tuesday, July 31, 2007

Yummy Treat!

I'm not much for cooking, but today on my walk I was wondering what it would be like to throw a bunch of things in a bowl and eat it. Well, it turned out to be sooooo yummy! I almost like it as much as ice cream. Almost...

Anyway, here's what you need:

1 ice cream scoop of low fat cottage cheese
1 small or medium banana
2 medium strawberries
Ground cinnamon
Shaved almonds

I scooped the cottage cheese into the dish, sliced the banana on top, put a dash of cinnamon on top of that, thinly sliced the strawberries and put them on top of the banana chunks, and then sprinkled the shaved almonds on top of that. One more dash of cinnamon topped the whole thing. Boy, it was good! Crunchy, fruity, and cinnamony goodness all mixed together! Plus you get your calcium! Can't beat that!